I tried to find a QNAP Download Station client (chrome plugin) but I couldn’t. Though Download Station is great, I think it’s simpler to right click on a link and do a selection instead of copy and pasting a URL to a web interface. There’s a great substitute though, Transmission:
The pictures above is actually from the chrome extension Transmission easy client which I prefer, there are other great transmission clients as well (even great ones for your phone). This client I actually got to work with SSL encryption through a NGINX reverse proxy, more on that later.
Install Transmission (server) through docker
I actually once had transmission installed locally on my QNAP NAS, but a QNAP update made it stop working and i couldn’t find it in the QNAP app-store anymore. That’s no biggie as I find it better running most things in docker containers. I used the docker image linuxserver/transmission but there are many other great similar containers.
The only thing you need to think about concerning settings are the volumes (shared folders) settings. I mapped the following Docker container folders “/config”, “/download” and “/watch” to local folders on my NAS, see below:
I don’t use the “/watch” folder today, but maybe I want to use it later on.
Tip: I once created the local NAS folder “/share/Container/volumes” to put all my mapped docker volumes in. This is because I too many times accidentally removed containers and by so deleting configs etc.
Now press “create” wait until container starts, hurrah!
Configure Transmission (server)
In the local folder you mapped “/config” to you will find the file settings.json. Edit this file and change field “rpc-password” and “rpc-username” to something else. Restart the transmission docker container, at startup transmission will detect the new none encrypted password and will automatically encrypt for you. If you edit the settings file again the password row will now display a something like “rpc-password”: “{a0a67ed23dfae8d511837326f938567ce86a9b074Qn2t/Hr” (encrypted version of your password).
Go to transmission web GUI, I had setup the Transmission container to use it’s own IP-address, so my URL was: http://192.168.2.3:9091 (default port is 9091).
There you go, done!
Setup Transmission easy client extension for Chrome
Install the Chrome extension Transmission easy client (there are a great client apps for phones too). Right click and select options, change the settings and press “Check the settings” to verify, done!
Extra credit: Add SSL encryption to Transmisson
If you want to connect to your transmission server from other places than your local home network, I strongly encourage you to use SSL encryption so the password is not sent open over the internet. There are many options on how to accomplish this, you could choose another Docker container with better support for SSL or as in my case use NGINX as a reverse proxy server in front of the Transmission server.
Notice the green URL link indicating the content is encrypted through NGINX!
Before continue reading further, you need to acquire a SSL certificate. I’m using a Let’s Encrypt free certificate. Here’s a guide on how to get it for a QNAP NAS.
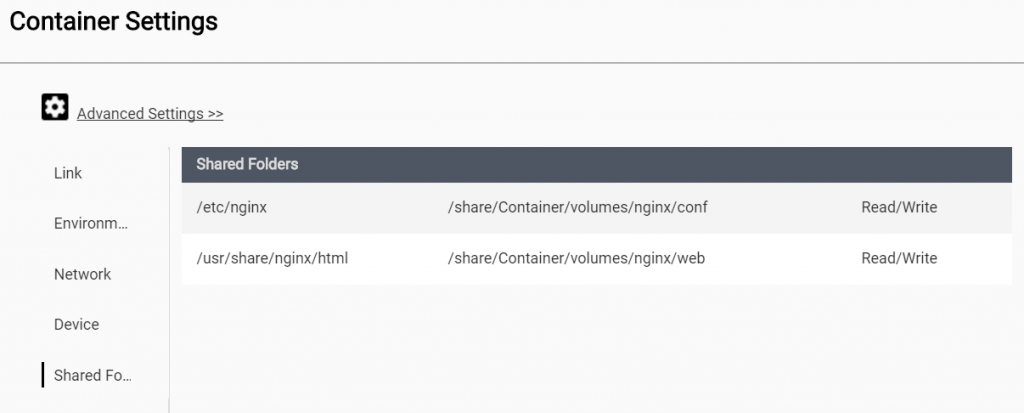
Installing NGINX through docker is easy I used the image simply called NGINX. I mapped the folders “/etc/nginx” and “/usr/share/nginx/html” to local folders:
Configuration of NGINX is done through the file “nginx.conf” located in mapped conf folder. Below is an example of the config parts used by transmission:
upstream transmission  {
		server 192.168.2.3:9091; #Transmission
	}
	server {
		listen 443 ssl http2;
		server_name nas.filegott.se;

		### SSL cert files ###
		ssl_certificate    /etc/nginx/certs/chained.pem;
		ssl_certificate_key    /etc/nginx/certs/domain.key;

		### Add SSL specific settings here ###
		ssl_session_timeout 10m;

		ssl_protocols SSLv3 TLSv1 TLSv1.1 TLSv1.2;
		ssl_ciphers ALL:!ADH:!EXPORT56:RC4+RSA:+HIGH:+MEDIUM:+LOW:+SSLv3:+EXP;
		ssl_prefer_server_ciphers on;

		location / {
			return 301 https://$server_name/transmission/;
		}

		location ^~ /transmission {
			proxy_set_header X-Real-IP $remote_addr;
			proxy_set_header X-Forwarded-For $proxy_add_x_forwarded_for;
			proxy_set_header Host $http_host;
			proxy_set_header X-NginX-Proxy true;
			proxy_http_version 1.1;
			proxy_set_header Connection "";
			proxy_pass_header X-Transmission-Session-Id;
			add_header   Front-End-Https   on;

			location /transmission/rpc {
				proxy_pass http://transmission;
			}

			location /transmission/web/ {
				proxy_pass http://transmission;
			}

			location /transmission/upload {
				proxy_pass http://transmission;
			}

			location /transmission/ {
				return 301 https://$server_name/transmission/web/;
			}
		}
	}
This config above assumes you already have generated SSL certificate files in this case named “chained.pem” and “domain.key” and placed them accordingly (in this example “Share/Container/volumes/nginx/conf/certs/…”).
Hi, great guide, thanks!
I’ve used it in my TS253-Pro with QTS 4.2.4 to test the container (and Transmission…) functionality before upgrade to QTS 4.3…
Just a question: do you know how to modify the container configuration to add a UDP port forward in addition to the existent TCP 32776 -> 51413?
I’ve also noticed that the internal port (51413) is somewhat exposed to the remote peers and my firewall receives TCP and UDP traffic on both 51413 and 32776 port on both TCP and UDP protocol…
Thanks,
DiSa.
Thanks!
No I haven’t tried UPD forward on container, sorry. You receive both UDP and TCP traffic… interesting….
I looked over my settings and realised I had ports 49152-55000 (both UDP and TCP) router/gateway forwarding to Transmission, changed to only TCP. That should work..
My setup concerning Transmission:
TCP ports:
– My router forwards only TCP ports 49152-55000 directly to my Transmission container
(running in “bridge” mode with it’s own ip 192.168.2.3)
HTTP/HTTPS traffic
– Not forwarded to Transmission by router, but go through a nginx reverse proxy
(running in “host” mode with Ip same as Nas 192.168.1.4 but using port 8443), simplified:
nas.filegott.se:443(router port forward) -> 192.168.1.4:8443 (nginx reverse proxy) ->192.168.2.3:9091
Transmission configuration:
– Using same ports as router forwards (settings.json)
“peer-port”: 51413,
“peer-port-random-high”: 55000,
“peer-port-random-low”: 49152,
Maybe I should set it up differently…. I work with coding not networks so might “screwed” it up 🙂
I fail to understand how you can successfully pull and install/run the Nginx image found on Docker HUB.
That image defaults to bind to port 80. Since port 80 is permanently bound to the apache instance serving the QTS front end, the Nginx container will immediately abort with an error message.
Thus it is impossible to ever get inside the container and modify the nginx.conf
I ran the container in QNAP “Bridge” mode so it gets its own IP address (no port conflict). I would recommend a container like “haugene/transmission-openvpn” with built in VPN support. I use that today instead.